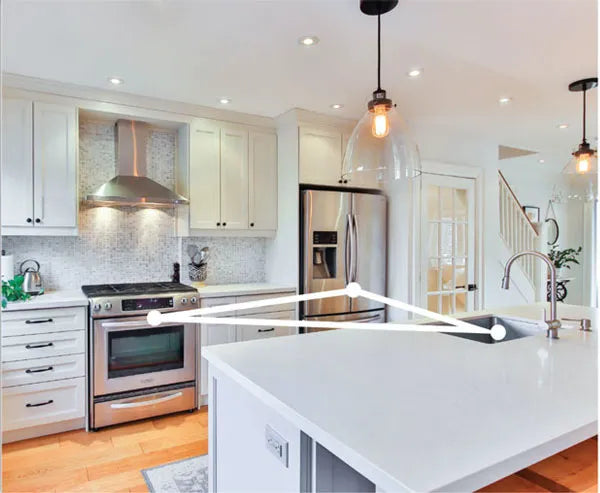
The Kitchen Work Triangle
Before we get into the specific layouts available, it’s important to understand the purpose and function of the kitchen work triangle.
The kitchen work triangle is formed by the three main work areas of your kitchen–the food preparation zone (your counters or fridge), the washing zone (sink or dishwasher), and the cooking zone (stovetop or oven). Essentially, when your kitchen is finished, you should be able to draw metaphorical lines between the zones in the form of a triangle.
The work triangle is all about efficiency. Each of the three zones should be no more than three or four feet from each other so you can move easily from one zone to another in just a few steps.
The most important part of the work triangle is the relationship between the sink and the stovetop. We recommend keeping them in the same stretch of counter so you can easily bounce between your meal and the dishes while you cook.
Though they aren’t required in a kitchen layout, the work triangle will almost always naturally occur as you design your space. Paying close attention to your work triangle will help increase efficiency and better enjoy any kitchen layout you choose.
Now that you’ve considered the practicality of implementing the work triangle into your kitchen, it’s time to choose the right layout! No matter the size of the space you have to work with, you will find the right design for your kitchen with one of these 6 common kitchen layouts.
1. U-Shaped Kitchen Layout
✅ Pros
- Plenty of counter space and storage
- Separates the kitchen from other parts of your home
- Allows for the optimal work triangle space
- Easy to organize
- Can be open or easily adapted into a closed kitchen
❌ Cons
- Can feel cramped if designed too narrow and deep
- Corner cabinets can be inconvenient
- Only one way in or out can cause traffic jams
- Expensive to install all needed cabinetry
- If squeezed into a small space, having multiple cooks can be difficult
L-shaped kitchens are very similar to U-shaped kitchens, except that they are arranged in an L-shape and have cabinets and appliances installed along two walls instead of three.
L-shaped kitchens are great for maximizing efficiency with the work triangle. Because working stations are set up on just two walls, it's easy to move between working stations in just a few steps.
Since L-shaped kitchens are usually tucked into corners where walls meet at a 90-degree angle, they have two open ends for easy entrances and exits. This is great for busy families or entertaining guests–it’s unlikely that you will get in each other's way!
Open plan living is a popular homestyle right now, and L-shaped kitchens fit perfectly in this concept. Arranged along only two walls, L-shaped kitchens naturally open into the surrounding rooms. Ideally, your kitchen will open into either the dining room or living room.
✅ Pros
- Great for corner space
- Works well with small and medium kitchen spaces
- Minimal through traffic
- Efficient working triangle
- Natural fit for an open plan home
- Good for multiple cooks to use at once
❌ Cons
- Not the best for large kitchens because things get spread too far apart
- Can limit storage space
3. Island Kitchen Layout
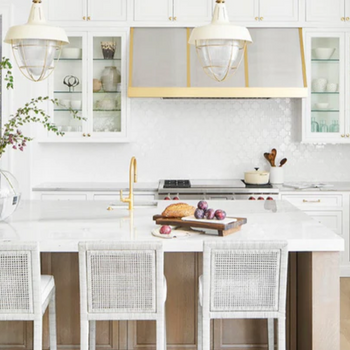
If you're looking for a kitchen with ample storage and counter space, an island kitchen is the best choice! Suited especially for large kitchens, island kitchens are typically arranged in a U-shape with a freestanding section of counterspace (also known as an island) in the middle of your kitchen.
Kitchen islands are ideal for adding counter space and storage. Most islands include base cabinets on one side to store kitchen essentials. On the other, many islands have extended countertops to accommodate seating. Add just a few stools and you will have a great casual dining space!
In addition to installing a kitchen sink against a wall, some homeowners choose to install a sink in their island instead. You can also put your cooking station in your island by installing a flat stove stop in it.
Whether your island becomes a washing zone, a prep zone, or a cooking zone, you can create an efficient working triangle very easily in an island kitchen. You will want to make sure there is at least 3 feet of clearance on all sides of your island to prevent crowding and inefficient traffic flow.
Of all the kitchen layouts, island kitchens are the best for socializing. If you have a large family or love entertaining, this may be the best layout for you!
✅ Pros
- Additional storage and counterspace
- Allows for additional casual seating
- Defines space in a open concept home
- Becomes the heart of your kitchen
- Can be an open or a closed kitchen
❌ Cons
- Not suitable for small spaces
- Requires special plumbing if you install an island sink
- Expensive to install
4. Peninsula Kitchen Layout
Peninsula kitchens are popular because they have some of the same functional properties as an island kitchen but are better suited for smaller spaces.
Like an island kitchen, peninsula kitchens feature an additional worktop, but it’s attached to the wall instead of standing in the middle of the kitchen. This saves space because you don’t need the 3 feet of clearance on one end.
Peninsula kitchens create a U-shape, but differ from U-shaped kitchens because the third side is completely open and accessible from three sides. Usually, one side of the peninsula piece opens into another room.
The peninsula worktop usually includes base cabinets for extra storage. Like an island, you can extend the opposite side of the countertop to accommodate stools and create casual seating.
✅ Pros
- Great small kitchen layout
- Increases counter space
- More storage
- Peninsulas can be short or long, depending on your space
- Can accommodate efficient work triangles
- Typically part of open kitchen concepts
❌ Cons
- Prone to traffic jams since there is only one entrance
- Corners are often tight
- Not very efficient for large kitchens
5. Galley Kitchen Layout
Looking for an efficient use of space? A galley kitchen might be your best fit! This kitchen layout arranges counter tops and appliances on parallel walls with a walkway that opens into other rooms on both ends.
Galley kitchens eliminate space that is sometimes wasted with inconvenient corner cupboards. To maximize the efficiency of the work triangle, place the sink, dishwasher, and stove on the same wall with the fridge and additional counter space on the opposite wall.
A clear and ample walkway is critical for galley kitchens. Make sure there is at least four feet of space between the cabinets and appliances on each wall. Be careful to accommodate for open oven, fridge, or cabinet doors if possible, since they can block the walkway and prevent your family’s movement throughout the kitchen.
✅ Pros
- Optimized for efficiency and function
- Great for small spaces
- Cost effective
- Part of a closed kitchen concept
❌ Cons
- Can be too narrow
- Harder for multiple people to use it at the same time
- Limits storage space
6. Single-Wall or One Wall Kitchen Layout
In single-wall kitchens (also known as single run kitchens or one wall kitchen layouts), the counter space and appliances are arranged in a single line against one wall. This arrangement is great for small spaces when other kitchen layouts are impractical.
It’s recommended to have counter space on either side of each major appliance. Because less counter space is needed next to the fridge, it’s often placed at the end of the row in single-wall kitchens. Just be sure that the fridge door opens away from the wall!
The most important consideration to remember with this layout is the amount of storage you need. With only one wall to place cabinets, you will have to get more creative when storing all your kitchen items and food. Think vertical! Install cabinets that are floor to ceiling to make the best use of your wall space.
Open vs. Closed Kitchens
When renovating or designing a new kitchen, you will need to decide if you want it to be opened or closed.
Open kitchens are meant to have easy access and open into the dining or living room space in your home. In some concepts, the kitchen is part of a “great room,” which can encompass the dining space, living room, and kitchen in one completely open concept. This is great for homeowners who like to integrate the majority of their family’s activities into one common space.
The disadvantage is that open kitchens can make your home look cluttered and unkept if not cleaned regularly. Smells from food prep, cooking, or trash can more easily travel throughout the rest of your home.
In contrast, closed kitchens are kept completely separate from the rest of the home. For chefs who value their privacy, this type of kitchen can become a cooking or baking sanctuary! It also separates the mess and smells from the rest of your home.
Closed kitchens are more formal and may limit the amount of socialization you have while preparing meals and entertaining guests. They also have more limited openings, which can lead to traffic bottlenecks. It may also be more difficult to have multiple cooks in the kitchen at once.
Universal and Accessible Kitchen Design
You may be interested in universal and accessible kitchen design if you have a family member with a disability, are caring for elderly family members, or are planning ahead for staying in your home as you age.
The great thing is that universal kitchens follow the same principles of a standard kitchen so you can choose any layout you love and make adaptations as needed.
Here are some of the most basic changes to consider in your universal kitchen.
- Pay attention to counter space around appliances. Since movement between workstations may be more difficult, it’s best to have between 18 and 24 inches of clear countertop surface on both sides of your cooktop and sink. You should have at least 24 inches to one side of your fridge and oven.
- Lower work surfaces, light switches, and outlets. Standard counter tops are 36 inches tall. Accessible kitchens should have counters that are 30 inches tall. Outlets and light switches should be no higher than 37 inches from the floor and can even be mounted on the front of cabinets.
- Open space under sink and cooktop for seated use. Standard kitchens typically have cabinets for storage under the sink or cooktop, but in accessible kitchens this space needs to be open (especially when designing for wheelchairs). Ensure the open space is approximately 30 inches wide, 27 inches high, and 19 inches deep.
- Be careful with your hardware. Install easy to use pulls, touch handles, levers, and handles for cabinet doors and drawers.
- Install cabinet doors that open wider. We recommend having 170-degree hinges on your cabinet doors.
- Reduce height of upper cabinets. The standard height for upper cabinets is 18 inches above the counter top. For better accessibility, upper cabinets should be installed no higher than 15 inches above the counter.
- Increase visibility. Rather than having to open your cabinets to see what’s inside, a kitchen designed for accessibility may benefit from open shelving or cabinet doors made with clear glass. Your cooktop should also have easy-to-see, front access controls.
- Add more rolling slides and drawers. The typical shelving in your cabinets may be hard to access, especially when sitting in a wheelchair. Installing sliding shelves in your cabinets makes it easier to find all your kitchen items.
- Upgrade your sink with ergonomic features. We recommend installing single-lever, high arc faucets with a pull-out sprayer.
Which Layout is Best for Your Home? Questions You Should Ask Before You Choose
Now that you’ve learned all about the six most common kitchen layouts and tips adapting to special needs, it’s time to determine which layout will be best for your home. Here are some questions to answer that will help you narrow down your choice.
- Who will be using the space? Designing for the primary chefs in your home takes priority but you should also consider small children and elderly family members. It’s also best to get input from anyone else who helps your family with cooking or cleaning.
- How many cooks do you usually have? If you have multiple family members who like to cook together, find a layout that works efficiently for more than one person.
- What is your lifestyle like? Do you cook often or is takeout more your style? How often do you entertain? This will help you decide the size and storage needs of your kitchen as well as whether it should be open or closed.
- Do you need to adapt for accessibility? An increased budget may be necessary for custom cabinets, counters, and appliances to properly adapt your kitchen.
- Will you need to do other activities outside of making and eating meals? If you have kids doing homework or need to meet work-from-home needs in your kitchen, you may want to create additional counter space and seating.
- Do you have pets? You will want to choose a kitchen layout that has space for food and water bowls.
- Do you want a pantry? Some layouts are more suited to including a pantry than others.
- How much storage do you need? Consider how many small appliances you need to store in addition to dishes and food. If your family is small or you don’t cook very often, smaller layouts may be fine. But if you cook a lot or have a large family, more storage will be a priority.
What Are 10x10 and 12x12 Kitchen Layouts?
As you design your kitchen, it’s likely that you will come across 10x10 and 12x12 kitchen layouts. The 10’x10’ layout is considered the standard dimensions of a medium-sized kitchen while the 12’x12’ layout is a standard large kitchen.
Most kitchens will require a designer and some customization to fit all the kitchen cabinetry you need, but 10x10 and 12x12 kitchen cabinet layouts can provide a rough estimate of the cost of cabinets for the size of your kitchen. These standard dimensions help customers can easily compare cabinet prices.
Renovating a 10x10 kitchen layout will typically cost between $10,000 and $25,000. Upgrading a 12x12 kitchen layout ranges from $14,000 to $36,000 for a full scale remodel.
Let Vevano Help With Your Kitchen Remodel
Still not sure which kitchen layout is best for your renovation? Get advice from our expert interior designers! Vevano Home designers help you avoid costly kitchen renovation mistakes while also ensuring you love your completed project.
The consultation is free, and when you order products from us, you get to deduct the cost from our design retainer, so the design service pays for itself until it’s free!

