Featured Design Project: Modern Farmhouse Bathroom Remodel
By Jessica Earley
October 6, 2021
Lauren is an avid DIYer and interior design enthusiast who’s spent the last year documenting her home renovation on Instagram @farmhouseish. Though Lauren had already successfully upgraded other parts of her home, her latest project—remodeling her entire bathroom—was the most extensive renovation yet.
For that reason, Lauren reached out to our Vevano Home designers for help planning the fine details and making her dream modern farmhouse bathroom come to life.
Before
Lauren describes her style as “modern farmhouse meets boho” and prefers lighter colors and a clean, modern aesthetic. Her original main bathroom leaned more Tuscan and traditional, featuring dark, mahogany-looking wood, bell-shaped lights, and ornately framed mirrors hung over the granite countertops. Everything was far from the modern farmhouse look she wanted.
From a functional standpoint, Lauren wanted to keep the beautiful walk-in shower but didn’t like that there wasn’t a bathtub. Though the existing setup had floor-to-ceiling cabinets and ample storage, her family didn’t use all the cabinet space.
“Our original bathroom simply didn’t bring us joy,” Lauren says. “It didn’t fit our needs. And it was the room that we started and ended our days in! We knew it needed to be updated so it could be more functional for us and feel like ours.”
The Design Process
Initial Consultation with Vevano Home Designer Martha
Lauren was paired with Vevano Home designer Martha for this bathroom remodel. Martha has extensive expertise in home remodels, including bathrooms, and knew exactly how to help Lauren achieve a modern farmhouse bathroom. In their initial consultation, Lauren and Martha brainstormed the fixtures and upgrades that would meet the modern farmhouse style.
Lauren’s top priority was to fill the space with bright and airy elements rather than keeping the darker elements in the original layout. Lauren also wanted less storage, suggesting that they remove the floor-to-ceiling cabinets, allowing room for a tiled look along the back wall behind the new vanity. She still wanted double sinks in the vanity, but she wanted a simpler design with modern lighting and minimalist mirrors.
Next on Lauren’s wish list was to make significant upgrades to the shower and bathtub—which meant creating space for a bathtub that didn’t even exist yet! Since she only has one other bathtub in her home, she hoped they could find space for a freestanding bathtub by removing the tall cabinets and moving the vanity over. Lauren was already happy with her walk-in shower, so all she wanted to do was paint the existing tile white to match the other bright elements she hoped to add.
After hearing Lauren’s ideas, Martha asked clarifying questions to help complete her notes before starting on the concept board. Though Lauren tends to choose white cabinets and other pieces throughout her home, Martha explained how a darker-colored vanity could complement the light interior of the bathroom. They also talked through tub ideas and how they could work with the current layout.
“At first, I was worried about the layout, what our options were, and what would look best where,” Lauren says. “Talking through those worries initially with Martha was very helpful!”
Developing Concept Boards
Once Martha had enough details from her conversation with Lauren, it was time to draft the concept boards. Lauren had already chosen a white and grey oriental-style floor tile and a light grey, hexagonal tile for the wall behind the vanity. Martha made sure to match all the fixtures and finishes to those tile choices when creating concept boards. She created two concepts to help Lauren compare different looks.
On the first concept board, Martha chose a beautiful black vanity with silver hardware. Though Lauren was open to mixing finishes on the hardware, Martha chose matte black finishes for all the hardware and fixtures in this concept so nothing would compete with the statement silver pulls on the vanity. She wanted Lauren to see how dark elements could pop beautifully against the light walls and tile while still achieving the bright airy feel she wanted.
On the second concept board, Martha included a white vanity that looked like other white cabinetry that Lauren has throughout her home. She mixed matte black fixtures with gold hardware to show how the contrast could add unique elements to the bathroom.
“A lot of people are apprehensive about mixing finishes, but I always recommend it,” Martha says. “I think it adds a lot more visual interest, and then you’re not limited by trying to find every fixture with the exact same finish.” Martha chose a freestanding bathtub for both concepts.
Creating a 3D Rendering
Before Lauren committed to new products for her new bathroom, Martha helped Lauren better visualize the space by creating a 3D rendering. Though a concept board gives an idea of how the different finishes and fixtures will look together, the 3D rendering allowed Lauren to see exactly how her bathroom would look after remodeling.
Additionally, the 3D rendering gave Lauren an idea of how her new fixtures would look in proportion to the rest of the room. One of Lauren’s biggest worries was whether the bathtub would fit in the space as planned. The 3D rendering cleared up all her concerns!
“Martha and I were on the same page design-wise right away which felt great,” Lauren says. “But when it came to adding a tub in the bathroom where there hadn’t been one before, I had my doubts about if it would truly work. When I saw the rendering Martha created with the layout and all the items, I felt so much more confident that it would work!”
Selecting Products
After viewing both the concept board and 3D rendering of the space, Lauren was ready to order products for her modern farmhouse bathroom remodel.
Ultimately, Lauren loved the first concept board. “I never planned on having any nickel brushes in the bathroom,” she says. “My go-to hardware combo is black and brass! But when Martha suggested the Wesley vanity, I knew right away it was the right choice. The light fixtures she suggested tied it all together with the rest of the black fixtures. So smart!”
With the help of Martha’s design insights and product recommendations, Lauren chose the following pieces from Vevano Home:
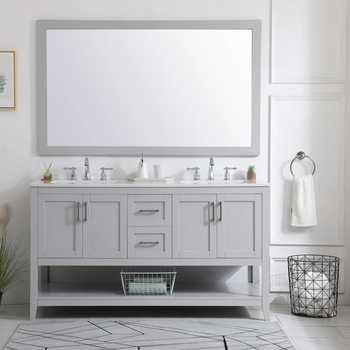
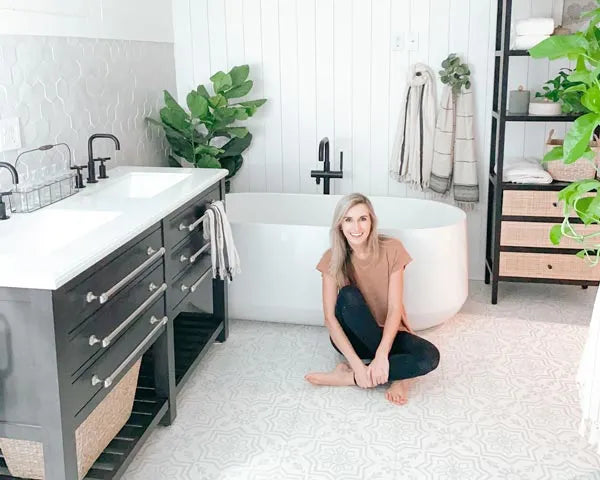
Cahaba Wesley Iron Grey Freestanding Vanity
The Wesley Vanity added a modern industrial touch to the space. It includes oversized hardware and clean, straight lines—keeping things sleek and simple. Though it has six pulls, this vanity only has two drawers and one open shelf along the bottom, allowing Lauren to simplify her bathroom storage. The three predrilled holes for each sink allowed her to choose from a variety of faucet options.
Kohler Ceric Freestanding Tub
Choosing the right tub was one of Lauren’s biggest worries, but she quickly fell in love with the Ceric Freestanding Tub when it arrived for installation. This tub expresses contemporary warmth and simplicity while giving you the depth and features to create a relaxing, spa-like experience. The sloped lumbar support adds comfort as you relax. Cast with Kohler Lithocast Gloss resin, this tub is lightweight for installation and has an easy to clean, high gloss finish.
Kohler Purist Fixtures
All of the fixtures Lauren chose were from the Kohler Purist Collection. This collection offered exactly what she wanted in terms of style—simple, unembellished forms, clean lines, and a minimalist look. They offer a quiet, organic elegance that’s a natural fit for the home spa.
Like what you see? You can browse all of Lauren's remodel products at Vevano Home.
Providing Detailed Floor Plans
Concept boards and 3D renderings were just the first part of Martha’s involvement in Lauren’s bathroom remodel. Though Lauren had plenty of experience doing DIY remodels, she knew that completely gutting the bathroom and adding plumbing for the new bathtub would test her skills.
Luckily, Martha was there throughout the whole process. She provided extensive floor plans and measurements so Lauren could confidently DIY many of the upgrades herself.
Ensuring a Smooth Installation
Martha was immensely helpful when Lauren had to make a design pivot partway through the remodel. When they found out that the lights Lauren wanted were back-ordered, Martha helped her find new vanity lighting that still met all her style needs. That way, the project was still completed right on time.
“It was so helpful having a second set of eyes on everything,” Lauren says. “This was the first renovation project I’ve done where we totally gutted the room. Figuring out which items I could order to fit my existing space while also making sure they worked together was new to me! Martha made that much easier with the expertise and renderings of my space.”
After
The finished remodel was everything Lauren dreamed of! It took about 10 weeks to finish as Lauren took her DIY skills to the next level. Nearly everything from Martha’s concept boards worked out exactly as planned, creating a light and airy modern farmhouse-style bathroom. Lauren’s favorite element? The freestanding bathtub!
“To be honest, I’ve never loved baths,” Lauren says. “But this bath might just make me a bath person!”
Now that Lauren’s bathroom is complete, she’s moving on to the next room on her extensive DIY remodel list. But now she has the perfect place to relax after a long day of working on the rest of her home.
“The quality of the Vevano Home items is incredible,” Lauren says. “From the vanity and tub to the whole Kohler line of fixtures, they're some of the highest quality items in our home! It makes a huge difference in the overall look, feel, and function. When I walk into that room every morning, I look around and smile. It didn’t serve us before and we never loved it. Now it feels like ours!”
Bathroom Remodel—Before and After
Bathroom Remodel—Before and After
DIY Pro-Tip: Work with a Vevano Designer
Vevano designers are a DIYer’s best friend! Even with great DIY skills, consulting with an expert can help you have the best outcome possible. Designers like Martha can help you fully visualize your changes before making a full commitment. Their guidance can help you avoid delays in your remodel and making costly mistakes—meaning you can finish your upgrades on time and under budget.
Plus, when you work with a Vevano Home designer, any products you purchase from Vevano Home are deducted from your retainer—essentially making your design free! Reach out to our designers today for a free consultation on your next home project.

